House Rendering: How it's Done, Pros, Cons, Plus Inspiring Projects
House rendering is a more adaptable external finish than you might think at first. We delve into the types available, the pros and cons, and look at inspiring houses that showcase it's versatility
House rendering is one of the most common forms of cladding used on contemporary homes, and for good reason. There are many types of render, each lending themselves to certain uses that ensures there's a render perfectly suited to virtually any type of property — from lime renders helping old properties breathe to contemporary, crisp Monocouche renders.
When it comes to contemporary ideas for house cladding, rendering is often used as part of a range of materials to create interesting, striking homes. Properties that also use the likes of timber or stone cladding rely on rendered finishes as a supporting character, balancing the look of the house and adding areas of relief to intense, busy finishes.
However, with so many types of render available and so many applications for the external design of your house, you may find it hard to know where to begin in investigating the right render for your project.
Read on for our complete guide to render, alongside advice for the likes of planning permission, maintenance, cost and more. Plus, we've included some incredible self build and renovation inspiration to help showcase what render is capable of as an external finish.

What is House Rendering?
Think of house rendering as a type of cladding for the exterior of the house — applied to the exterior of a home, much like plaster is applied to the interior walls.
There are two main reasons for house rendering:
- To protect the underlying house walls from weathering and rainwater penetration
- To provide an attractive appearance to the house
House rendering is largely chosen for its aesthetic value. It's a simple texture, and can be applied in any colour, making it a versatile choice for mixing and matching, or using by itself, on a property. However, it can be used to help protect walls from damp caused by adverse weather, and acrylic insulated renders can help to make your home more energy efficient.
However, it's not a cheap option for your home, especially over a large property. Make sure you choose the right type of render for your needs and give it proper weather protection to ensure it lasts as long as possible, or else you'll find yourself spending more money on removing it, or on costly render repair. This is particularly the case with cement renders, which have a tendency to crack and may lead to damp issues if water penetrates into these cracks.
These days there is an ever-growing range of house rendering products, from the more traditional lime renders, popular with renovators and those extending period houses, to those that also provide insulation and through-coloured renders.
Does House Rendering Stop Damp?
External house rendering is often used as a quick fix for penetrating damp, especially when caused by water trapped in cracks between the render and brickwork. However, it should only be used alongside measures to fix the causes of the damp. This may be roof issues or broken guttering and fascia boards, for example. It may even be worth repointing brickwork before rendering in some instances.
(MORE: How to Treat Damp)
How Much Does House Rendering Cost?
House rendering costs vary depending on the area your house renovation is in, the size and experience of your tradesperson and the house itself, in some cases.
- External house rendering, using a sand and cement method, with a finer topcoat costs around £35-60/m², including two coats of external masonry paint.
- Monocouche rendering tends to cost upwards of £40/m².
- Lime render is tends to be more time-consuming to apply as therefore costs start at a little more. From £45-50+/m² can be expected.
- If you plan on fitting external insulation, with a render finish, you can expect costs of approx. £70-90+/m².
Can I Render my House DIY?
It's not recommended. Rendering a house is a job best left to the professionals as you will want to get a wonderful, smooth finish for the render to look its best.
Doing it at speed and with enough precision to make it look good is very skilled work, and much like plastering walls, it takes time and expertise.
Do I Need Planning Permission for House Rendering?
If you live in a terraced or semi-detached house chances are you won't need planning permission to render your house but you will need to think about how the new look render will affect your neighbours.
Most exterior updates such as render, cladding, stone, pebble dash, timber fall under Permitted Development.
However it is not permitted under Permitted Development on any dwelling house located on Article 1(5) land which includes designated areas like an AONB, National Park, World Heritage site or Conservation Area.
It's always best to check with your local planning department before starting work.
Types of Render
Below are the types of house render to choose from:
Cement render is usually mixed on site before being applied in two or three coats. Cement render tends to be cheap in terms of materials, but a little more expensive on labour due to the numerous coats.
Modern cement renders are notoriously rigid and prone to developing small cracks over time that allow rain to penetrate, opening the door to frost blowing hollow voids under the surface, loosening the bond.
They will also require regular repainting if they are to continue to look good.
Polymer render is usually sold pre-mixed in bags with either white cement or lime as a base. Polymers and other plastic-based products added to them to make the render less prone to cracking. They are available in a variety of colours and are often through-coloured, which does away with the need for painting.
Acrylic renders are most often applied as a thin finish coat to seal and enhance the appearance or the underlying coat. They also bring colour and texture. Fibres are added to prevent cracking and give a durable, lasting finish.
Silicone render is also used as it promises even longer life and the capacity to be self-cleaning — some claim that when it rains, the silicone will allow rainwater to wash away any dirt!
Monocouche renders (French for ‘single layer’ or ‘bed’ renders) are relative newcomers to the world of house rendering. These products originated in Europe, so many of the big names — Sto, Knauf, Marmorit and Weber — are European.
Monocouche renders have the texture and flexibility of traditional lime renders, helping to eliminate cracking, combined with a hard-wearing, low-maintenance finish that’s weather resistant and visually appealing.
These properties are probably why mainstream housing developers now use through-coloured renders, usually with a traditional white or sandy lime-coloured finish.
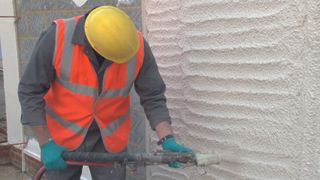
Monocouche render is supplied in bags, ready for mixing with water. It can be applied by hand trowel or sprayed on.
They use white cement and are pre-coloured (in any colour you want). They can be applied in one coat (typically around 15mm thick), so are quicker and therefore less labour intensive than traditional house rendering products.
The main disincentive for using monocouche render is probably cost.
Conventional sand and cement renders are made with cheap materials mixed on site before being applied in two or three coats, an established process that’s very familiar to small builders. Premixed monocouche renders are dearer and, although they are quicker to apply (needing only a single coat applied by hand or machine), it can be hard to find trades who are familiar with them.
A 25kg bag of Monocouche render costs between £8-£10/m², while the same size bag of traditional cement render costs around £1/m²
The cost is mitigated by the savings from not having to re-paint, and over time there will be additional savings from not having to redecorate. This is particularly significant with extensions with two or more storeys, where access is difficult and expensive.

Lime render is really the best option for old houses, where a breathable finish is essential for the house to work as it was originally intended
Although lime-based plaster tends to be a little harder to apply than regular Portland cement – meaning it is more commonly used in renovation projects and for conservation work — both Baumit and K Rend now supply polymer-enhanced lime renders which aim to overcome any related difficulties.
Lime plaster is a great option for those looking for a breathable house rendering system.
The advantages of lime render in include:
- It is more flexible than cement
- It is breathable so prevents problems with moisture getting trapped within the wall — a common problem where cement renders are applied to old walls.
- It looks very attractive and enhances the exterior of period homes in particular — though it does require regular coating with lime wash.
Lime house rendering products come in many different formats, including:
- Traditional lime putties (bought wet, by the tub)
- Bagged hydraulic limes, which behave rather like a weak cement. They need to be mixed on site with sand, and are hand trowelled in the traditional way.
- Monocouche lime renders — try K-Rend and Baumit
Lime render is a little more expensive than standard cement renders, but doesn't usually take any longer to apply and are a must for many period properties if problems with damp are to be avoided.
What Colours Does House Render Come in?

Render can either be painted or supplied as a through-coloured mix. Although through-coloured render tends to be a little more expensive, it is lower maintenance, requiring no subsequent re-painting.
House rendering can be painted or supplied in any colour you wish, but aim for a tone that either fits in with the materials used on the rest of your home or of that used in the local area.
Bear in mind that certain colours, such as a crisp white, will need cleaning or repainting more often in order to stay looking crisp. That said, there are now self-cleaning renders out there, such as PermaRock’s Nano-Quartz technology renders.
These have a surface designed to make it hard for dirt to stick, meaning rain and wind will natural wash them off.
Can I Mix Render with Cladding?
If you plan on using a combination of cladding materials on your house — great for visual appeal and to avoid a look that is too clinical on contemporary homes — there are a few factors to consider:
- The junction between two different cladding types give rise to potential waterproofing and airtightness problems
- It increases costs due to the requirement for separate suppliers and trades — it is also important to schedule each trade so they don’t overlap
- You need to consider the difference between those cladding which are self-supporting (brick and stone, for example) and those which need to be attached to something, such as render
Can I Use Render with External Wall Insulation?
In the UK, much of the insulation upgrading has been done via the cavity wall, but cavity construction is uncommon in other countries. There the preference has been to add insulation to the outside of the existing walls and then render over the insulation.
In cases where there is no cavity wall insulation (and no way of adding it in this way, in houses with solid walls, for example) it is useful to consider external wall insulation (EWI) systems.
These are made up of insulation layers, meshes and top coat renders.
External wall insulation promises a modern, clean-looking finish and is a great idea for those worried about adding insulation internally to solid walls due reducing internal spaces.
While these new systems are more expensive than traditional cement renders, they can often be applied in one coat — greatly reducing labour costs. They can also be applied directly to blockwork or some other substrate and this has proved popular with those seeking a clean, contemporary finish.
How Often Should You Render Your House?
House rendering should last between 20-30 years on average. Many professional renderers offer a guarantee on your render job of up to 25 years, so look to this for peace of mind.
How is House Rendering Applied?
Render is applied in several coats using a metal trowel. Screed battens are used to level out the render when applied.
When applying render, the base coats (or scratch coats) are scored when they are still wet to give a key for the next layer. The top coat is applied more thinly.
When the render has dried to a putty-like state (or touch dry), it can then be floated to remove any high points and tips, also removing any residual air bubbles.
Can I Render a House When it's Raining?
If attempting to render an elevation that's exposed to the elements while it's raining, you may end up with problems, including lime bloom, colour inconsistencies and textural issues. Keep an eye on the weather, as your render will need to be protected during the drying period using constructions of tarpaulin. Your renderer should handle this for you.
Rendering and frost also don't mix, so your renderer shouldn't work with frosted materials, and rendering shouldn't be undertaken when low temperatures are expected during the drying/curing stages.
Rendered House Ideas
Looking for rendered house ideas to inspire your own project? Here's some of our favourite builds that have used render in a clever way.
1. Honour the Original Property With a Partially Rendered Renovation

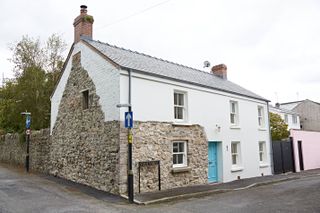
Previously coated in pebble dash, DIY renovator Luke Thomas stripped this cottage back to its original Welsh stone. However, in wanting to give the cottage a fresh new look, while nodding to its heritage, his choice to leave a small corner of the cottage un-rendered creates a striking contrast between the new white walls and the old stone.
2. Mix Other Finishes With Render
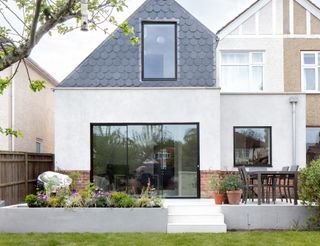
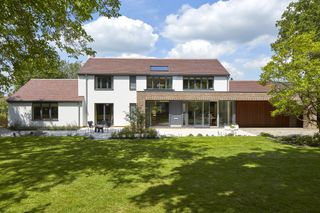
Huge swathes of render can work for some buildings, especially traditional ones with plenty of period detailing, while on others it can feel flat and lack character. If you're likely to end up with a plain white box after rendering, consider combining other types of cladding.
This extension, created by Oliver Leech Architects, uses a variety of cladding styles, including rendering and brick, to create an interesting exterior.
3. Use an Off-White Render for a Softer Finish
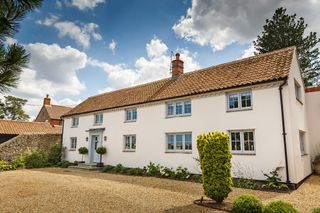
A brilliant white render can be dazzling and is often popular for contemporary builds, but it can also be somewhat stark and cold, not always creating a warming welcome to your home if not used with the right materials.
A softer, warmer white is a better choice for some properties, particularly older homes where it's new-ness isn't so much a selling point.
Looking at this period property from the front you’d be forgiven for thinking the whole building had been built at the same time. But, both the front and rear of the building have been radically extended, including a two-storey side extension.
The old and new parts of the building now join seamlessly thanks to a uniform silicone render, TC15 in Limestone White, from K Rend.
4. Use Rendered Finishes Sparingly

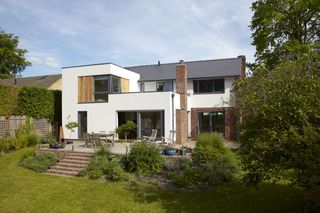
Rendered finishes can pull focus quite easily as they provide a strong contrast to materials such as timber cladding and brick. Instead of committing to a large amount of rendering as part of your house design, why not think of it as a way to draw the eye to a particular element?
In this project by Adam Knibb Architects, the rendered extension is the most architecturally interested element of the build, and thanks to the contract with the other materials, becomes a crowning jewel of this build project.
5. Make a Bold Statement With Render
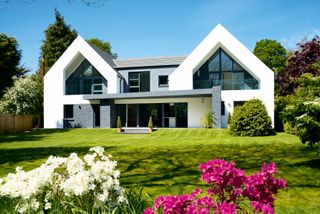
With all this talk of rendered finishes sometimes being dominating of the exterior of your home, sometimes that's exactly what you're looking for in an exterior, and with a suitably bold house design, render can make a real impact.
Stuart and Elmarie Ward’s original bungalow is unrecognisable thanks to the radical remodel and extension project they undertook. A mix of materials, including render and slate-effect cast concrete tiles, create a striking exterior façade.
Get the Homebuilding & Renovating Newsletter
Bring your dream home to life with expert advice, how to guides and design inspiration. Sign up for our newsletter and get two free tickets to a Homebuilding & Renovating Show near you.
Mark is the author of the ever-popular Housebuilder’s Bible and an experienced builder. The Housebuilder’s Bible is the go-to hardback for self builders; originally published in 1994, it is updated every two years with up-to-date build costs and information on planning and building regulations, and is currently in its 14th reiteration.
He has written for publications such as Homebuilding & Renovating for over three decades. An experienced self builder, his latest self build, a contemporary eco home built to Passivhaus principles, was created on a tight urban brownfield plot.
